Hand-Forged Farm
  • About Us / Contact

Soil Sampling and Testing part 1

31/5/2014

0 Comments

 
Hey everybody as promised here is a quick and effective way to test the composition of your soil.
Caring for your soil is vital to homesteading. The health of your soil is directly related to the health of your plants and since we and our animals are eating the plants, our soil is directly related to our health. Soil provides support for the plant roots, it's a home for beneficial organisms and a reservoir for the wate,r oxygen and essential nutrients required by the plants. You will find that insect and disease damage, as well as most poor growth issues are caused by unfavorable soil conditions. You must learn to think of your soil as a living organisms which has certain needs, abilities and limitations.  Only then you can effectively maximize the potential of your soil
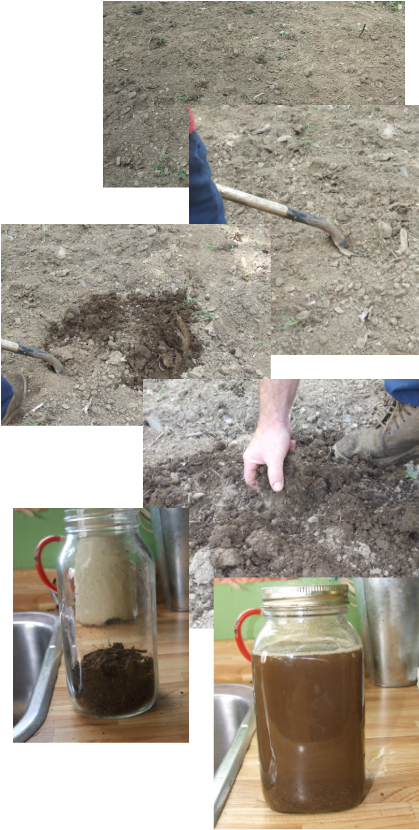
Before you can test your soil, you need to take a soil sample. To do this you will need a shovel and a 1 litre jar with a lid. To take a sample:

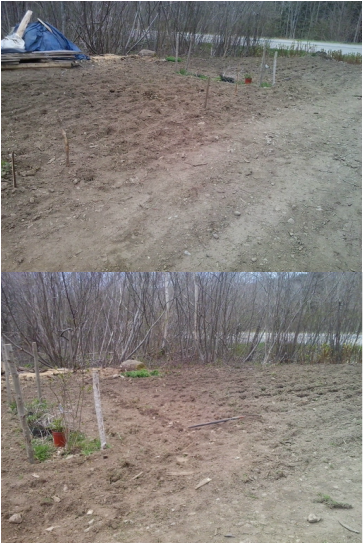
1  choose a patch of soil you wish to sample

2  Shovel the top 15- 20 cm depth of the topsoil into a pile.

3  Mix the soil with your hands, breaking up any clumps.

4  Place 1 cup of soil into your sample jar.

5. Bring your jar into the kitchen and fill to the shoulder of the jar with water. If you are going to use this sample to test pH you should use distilled water.

6. Placethe lid on the jar and shake vigorously for 5 minutes, then set your jar on a  flat surface and let it sit for 24 hours.
Picture
So how do you tell if you have good soil? All good soils are composed of 4
components, they are: minerals, air,  water and organic matter. It is the balance of the four components which is critical. The 'ideal' soil will have 45 - 50% mineral, 25% air, 25% water and approximately 5% organic matter.

The mineral portion of your soil is derrived from the erosion of rocks. the particles in the mineral portion can be sand, silt or clay. Sand silt and clay are simply different sized particles; all three particles come from the break down of different rocks  So how do they function within the context of your soil?Sand particles are the largest, silt is medium size, and clay has the smallest particle size of all.
Within the soil sand and silt particles keep the soil structure loose and workable. ( this is referred to as friable in the scientific literature). This helps to facilitate the movement of air and water within the soil. Clay  particles, the smallest, have an affinity for both water and nutrients. It is the amount of clay in your soil which makes those nutrients and water available to plant roots.

So go and take your samples, late spring and late fall are the best times to do this, mainly because those are the best times to add augments. Tomorrow I will show you how to check the composition of your soil. Have a great evening.

0 Comments

May 30

30/5/2014

0 Comments

 
Sorry everyone, no post today.  I am getting caught up in the garden and Gary is building the first top bar hive for me. So I have cooking duty tonight.  I'll have a post tomorrow and I'll show you how to test your soil composition. Have a great evening, enjoy that sunshine!
0 Comments

Making Soap

29/5/2014

0 Comments

 
Hey everyone. As promised, and especially for you Emily, a tutorial on  making goats milk soap.
First gather all the tools you will  need:
- a pair of rubber gloves
- a scale, preferably digital            
- a large Pyrex measuring  cup, a glass mixing bowl will work also, must be able to withstand temperatures of 140 degrees  F
- a large metal  spoon, preferably slotted
- a non- reactive cup to measure the lye in
- a pot to heat your oils in
- a thermometer
- a stick blender or whisk to mix with. If you are using a whisk, it will  take A LOT of whisking and you can't take breaks.
- a mold to pour the soap in
- an old towel to wrap the mold in (to insulate it).
  
  If you are going to be making soap on a regular basis you should invest in
some separate utensils used just for soap as you really shouldn't use tools for
soap and food.
  
Make sure you have enough space to work in. You are going to need to place  
things in the sink to cool, so make sure the sink is empty.
Picture
So now we need the ingredients for your soap. There are many different soap recipes but each one involves mixing a fat, or oils, with an appropriate amount
of lye. A chemical reaction takes place between the two called saponification.
This is what makes soap. When making soap, a good recipe gives amounts based in weight. You need to weigh your ingredients. A word about lye. Lye is a very dangerous caustic chemical. It will burn you. Not too close to the stove burn you; eat through your skin burn you. Treat it with respect. The mixing of lye crystals and  fluids, water and especially milk causes an intense chemical reaction. It gives  off a tremendous amount of heat and fumes. Always mix the lye under an open  widow that is drawing air or if at all possible outside. Safety glasses are a good idea also.

Back to the process.  First weigh out your milk. Every kilogram of soap requires 375 grams of fluid. It can be milk or water or a combination of the two. We are making goat  milk soap so our fluid will be goat milk. As I said, the reaction between goats milk and lye is a tremendous one. In order to preserve the skin healthy  properties of the goats milk you must freeze your goats milk. It can be frozen solid. At the very least, it needs to be the consistency of a slushie. 
I weigh my goats milk and place the exact amount I need in a freezer bag and freeze it the night before I plan to make soap. These 'milk bricks' can be placed into the Pyrex measuring cup. You can break up the brick if it doesn't fit
easily into the cup or bowel.
 
Next weigh your lye. The amount of lye will vary depending upon the amount and type of oils / fats you are using. Once you have weighed the lye, check again you have good ventilation, then slowly pour the lye over the milk. The lye
will almost immediately begin to melt the milk. Use your slotted spoon to slowly stir the mixture. You will begin to feel the heat given off by the reaction, as well as the fumes. Stand slightly to the side of the bowl and do not inhale the fumes.  You will notice the solution start to change colour. This is normal when using milk. Continue stirring slowly until you feel all the lye has been dissolved. One of the drawbacks to using milk is that you can't see if the lye is completely dissolved, but you should be able to feel with the spoon if the lye is dissolved.
Picture
As you can see I mix my lye in the sink. I leave it set there while I am
heating my oils. If the reaction is too violent, or I think my milk is too warm
to start, I fill the sink with cold water to a level just higher than the level
of lye / milk solution. Just leave the lye sitting for now, you should come back
every few minutes to stir the solution and check the temperature.

Now that the lye is mixed and cooling it is time to heat your oils. Carefully weigh your oils as per the recipe you are using. When you have all the oils weighed in your pot slowly begin to heat the oils. Take care when heating your oils as many of the oils used in soap and skincare products have low smoke points. They burn easily. 

While your oils are heating, give the lye solution a stir and check the temperature of the solution. Now is a good time to oil your mold. When the mold is oiled, check the temperature of your lye solution again, then clean the thermometer and check the temperature of your oils.
 
This is the most difficult part of making soap. The temperature is crucial.
We are aiming for a temperature between 100 and 110 degrees F. The trick is that both the lye solution and the oils must be the SAME temperature. ( within a
degree). This is the key to making good soap. If the temperatures are too far
apart the temperature differential will mess with the chemical reaction and you
may end up with oil or lye leftovers and this will make your soap do all kinds
of weird and not so wonderful things.
 
So keep an eye on your lye temperature. Let it be your guide. it is easy to
cool and re-heat your oils if necessary, but you don't want to start trying to
reheat a lye solution! If the temperatures are close, within a degree or three,
but are still over 110 F, take your oils off the heat and set them in your other
sink (if you have a double.) You can now start cooling them. Stirring the lye
slowly will help to cool it. If you haven't already, add some cold water to the
sink, not the solution itself. Keep checking the oils and the lye for temperature. Remember you are looking for between 100 and 110 degrees F. If the oils are too hot you can also add cold water to the sink around the pot. Be careful not to let cold water into the hot oils.
 
Once the two solutions reach that magic temperature it is time to mix!
 
Place the pot of oil on a flat surface where you can mix it with your stick
blender. Make sure you are wearing your gloves and some eye protection wouldn't  hurt also. I can't tell you the number of times I have had fresh soap splash all over my glasses.
So slowly pour the lye solution into the oils. As you are doing this use
the large spoon from the lye to stir the lye and oils. Use the spatula to scrape
all of the lye solution into the oils.
Picture
Use your spoon to mix the two liquids together. The lye solution will want to sit at the bottom leaving the oil on top. Just stir them until they start to mix together. You will start to see threads as the saponification begins to occur.
Now you can start using your stick blender.
Picture
You will start to see beautiful patterns as the blender does it's work. Just remember to  keep moving the blender around in the pot an be sure to move it up and down within the mixture.
Picture
 Continue to mix with the blender until the mixture reaches the consistency of
pudding. This is called  trace.  When you lift the blender from the mixture, it should leave behind the circular pattern from the blender . If your recipe calls
for any botanical, essential oils or fragrance oils to be added to the mixture this is the time to add them. Sometimes it's tempting to add more than the recipe calls for, but stick to the recipe. Too much botanical, and certain essential oils can cause the soap to seize if you add too much. This means that the soap hardens uncontrollably in the pot and batch is basically ruined.
Picture
Once you have added any botanical and fragrances that you want to add to the 
soap, and have incorporated them evenly into the mixture, it is time to  pour. Just take a minute to make sure the mold is evenly coated with oil, and  then you can lift your pot and  slowly pour your soap into the mold. Keep the pot  low and close to the mold.  This will help prevent any air pockets getting into your soap.
Use your spatula and make sure all of your soap gets put in the mold then gently tap the mold on a hard surface to release any air pockets that may be trapped within the soap.

Cover the mold, and wrap it in a large towel. The soap should be kept warm for the next few days as the soap begins to cure. Leave in the mold for 5 - 7 days. Depending upon the mold you use, you can choose to line the mold with wax paper to help remove the soap.
 Let the soap sit for another day after you take it out of the mold before you try to cut it. You can use a knife to cut your soap, or a drywall mud knife makes a good soap cutter.

After you cut the soap it will take another few weeks to cure completely, I know it is hard to wait, but the longer it cures the longer the bars will last.
So that is how you make goats milk soap. Not really difficult, occasionally tricky, but your skin will thank you for it!
0 Comments

Tidings and Tidbits

28/5/2014

0 Comments

 
Hey everyone, sorry for my prolonged absence. I have been swamped recently
and it has left my shoulder way too sore to type. (Too sore to do much of
anything to be honest). So just a few updates today...
The first  really isn't an update, it's NEWS. Big News. Big news I've been sitting on for  more than a week, bet'cha thought I couldn't  do it,  Drum roll.......
Our oldest son, Matt and his longtime girlfriend Sheena are moving to Bear River! YEA! They would like to buy the property up the road from us but it is a private sale and the owner lives out west. It is taking forever to even get in there and view. So they got tired of  living on edge and have found a rental in Bear River. They want to start getting to know the community, building relationships and developing opportunities now.
This is great news for us, we miss the kids.  Matt is our garden guy. He has been in charge of  family gardens since he was about 13. Also they are just fun to have around.
Welcome to the neighbourhood guys!
Picture
Last weekend I posted on facebook  that  Miss Avril was due on Sunday. Turns out Reiley read the calendar wrong. She is actually due next Tuesday.
Now Avril is a large goat, her normal weight is just shy of  200 lbs, right now she is HUGE. I feel for her. I was up in the pasture last  night seeing if the goats had cleaned up the latest crop of knotweed  we brought them and poor Avril came over to get her head scratched and she just stood beside me .... moaning. I could see the babies kicking her sides. She had  triplets last year and I wouldn't be surprised if she did it again this time.
We'll know in a few days!
Picture
The garden continues to be on hold. If it ever warms up enough I have the plants ready, but with frost forecast again tonight they will have to continue spending days outside and nights inside. I am ready to put in the first raised bed for the herb garden. Maybe some pics of that and information for you in the next few days. It can't stay cold forever.. can it?

We have been busy making soap. There are many lovely bars of soap curing in the house awaiting their debut. I have taken some pictures of the process so tomorrow there will be a post about making goat's milk soap. For today I will leave you with a great recipe for laundry soap that you can make at home... no weird chemicals needed.

                       Laundry Soap
Ingredients:
                    1 bar of a good laundry bar soap. I believe Sunlight still makes                       one, you might be able to get one in the grocery store or  Bulk                         Barn used to carry it
                      Baking Soda or Washing Soda
                      Borax 
                      Hot Water
                      Essential oil of your choice (optional)
Directions:
Grate the bar of soap, for every 1 cup of soap add 1 cup of soda and 1 cup of borax.  Mix well. Add boiling water to the mixture and stir. (I use a clean paint stick) continue to add water until all of the soap mixture is wet and there is approximately a half an inch of water above the soap mixture. (You may need to let it settle a little). Add the essential oils if you wish then set the mixture aside to cool overnight.
You should have a detergent that is almost a gel by the next morning. I use between 1/4 to 1/3 of a cup depending how dirty the clothes are.
 If you have a mechanic in the house orange essential oil is superb for cleaning grease.
 Before I go for today, I'll leave you with a little soap teaser for tomorrow....
Have a great day everyone!
Picture
0 Comments

My Top Five Medicinal Plants

22/5/2014

0 Comments

 
Hey everybody, today I want to talk about herbs. Those of you who know me know that I prefer to use herbal medications when I can. I am also a firm believer in preventing illness as opposed to treating it. Either way, both of these philosphies involve herbs. Full disclaimer: None of the following is to be considered medical advice. It reflects the wisdom of hundreds of generations of use, but it is not medical advice. 

 I have been planning my herb gardens most of the winter and I realized that there were several must have plants. Today I want to share the top five and why I believe you should incorporate them into your gardens.

The first is arnica. There are two varieties of arnica recognised for their medicinal properties: Arnica montana, the European variety, and Arnica chamissonis, the American variety. While both are perrenials, the American variety is easier to establish, is hardy to zone 5 and contains the same medicinal qualities. I have personnaly grown arnica in a protected area in a zone 4 garden so give it a go.  Just make sure they have about six hours of sun per day.
The medicinal part of the plant is the blossom. Harvested at full maturity they can be used fresh or dried. Just remember to leave some blossoms for more seed and just to look at, as these sunny yellow flowers are very pretty in any garden bed.
Arnica should, in my opinion, be in every first aid kit. It acts as an anti-inflammatory, analgesic, and antimicrobial aid. Its anti-inflammatory activity may explain why arnica reduces swelling time in injuries, and also quickly reduces bruising. It is also effective as an insect bite treatment and has been used as a topical pain reliever for sprains and burns. It has some mild antiseptic properties but as there are many herbs with better antiseptic qualities I would not use arnica for that purpose alone.
I have used arnica in tinctures, poultices, infusions, gel infusions and in creams. Anrnica should NOT be taken internally.
Picture
The next plant is elder.  I recommend American Elder, Sambucus canadensis. This is the same elder that was once found in almost every yard. Our grandparents knew a good thing when they saw it. You may have had elderberry jam or pie, but this plant is a very effective medicinal as well as delicious.
Growing up to 12 feet high, this shrub prefers a rich soil and full sun. Hardy from zone 3 - 11. The humble elder is coming back in favour and is quickly becomming a commercial crop in parts of North America.
Traditionally the flowers, berries, leaves and inner bark have been used medicinally.
Elderberries have powerful antibacterial and antiviral properties. I use themfor treating colds, sore throat and flu. Studies completed in the past few years have identified elderberry's ability to deactivate proteins the flu virus requires to attach itself to cells.
I use the berries in syrups, lozenges and teas. The flower is also used in infusions. Elder flower infusions or teas are used in Europe as an expectorant for chest colds. It is also worth noting that culinary use of elderberries and flower heads has a powerful effect on the immune system and plays a big role in prevention during cold and flu season. If you want an amazing treat, dip elder flower heads in a light batter and fry. They are AMAZING!
Please note the outer bark, roots, leaves and unripe berries are considered toxic and should NOT be taken internally.
Picture
Picture
Next is calendula. Calendula is integral to many of the creams, ointments and soaps I make. It is from the marigold family and the variety with the most medicinal value is Calendula officinalis. Commonly known as pot marigold.
It is an annual, but self seeds readily. The medicinal properties are located in the petals and should be harvested at full bloom.They can be used fresh or dried. The patals are also good in salads, omeletts and cheese.They also have a long history of use as a food dye.
Calendula has strong antimicrobial,  antifungal, astringent,immunostimulant and anti-inflammatory properties. This makes it a great candidate for topiclal creams and ointments for cuts, burns, dermatitis, chafing, insect stings and diaper rash. I have also had success treating mild to moderate acne with calendula soap and infusion. Calandula also has the ability to stimulate collagen production. The main benefit of this action is the reduction in scarring when calendula is used.
As versitile as it is effective calendula can be utelized in creams, tinctures, infusions, teas, gels, facial steams and poultices. Calendula also rivals yarrow as a coagulant. During the American cival war calendula was used as an antibiotic and coagulant in battlefield dressings.
Mullein. Even if you have never heard the name I guarentee you have seen mullein. Mullein, Verbascum thapsus is seen mostly as a weed today. It prefers dry sandy, marginal soils, usually found on roadsides and especially in quarries mullein is a wonderous, underutelized herb that deserves more attention. I happen to think it is beautiful as well. Although I wildcraft most of the mullein I use is is also worth trying to grow some in the hot sunny parts of your land where nothing else will grow. It is a biennial, so when growing in your garden plant every year, and as alwys, when wildcrafting always leave at least 2/3 of the plants to regenerate the supply.
The leaves and flowers are the most commonly used parts of the plant although the root has historical uses also. Traditionally the leaves were used for chest colds, and asthma treatments. It is a powerful expectorant. The leaves are high in mucalage and thus are soothing to irritated inflames mucus membranes. The leaves should only be used by trained practioners as they contain rotenone, It is also a diuretic and has traditional use in treating kidney ailments. I use the flowers of mullein, harvested when open, in an oil infusion to treat earache. The flowers contain strong antibacterial compounds and are soothing. Combined with garlic in an infused olive oil it makes a very effective treatment for earache and ear infections.
Inaddition to potential toxin in the leaves the seeds of mullein are highly poisonous.
Picture
Well I've left the best, and the most controversial, for last. Yep, it's comfrey. I consider comfrey to be an amazing plant. It has been a powerfull effective medicinal for thousands of years but has been given a bad reputation in the past few years. Let me just tell you why I love comfrey, and I'll deal with the controversy at the end.
First, from a land management standpoint, as all you permaculture people know comfrey is phenominal plant to improve your land. It is a fantastic dynamic accumulator. Comfrey is deep rooted; these roots work to bring nutrients up from the subsoil and make them available at the surface. This is accomplished via the leaves. An average comfry plant will  produce 4-5 lbs of leaves per established plant/ per year. The leaves are rich in nitrogen and potassium with a good  amount of phosphorus as well, making them a wonderful homegrown fertilizer.  Employing this nutrient is as easy as making compost tea with the leaves, or simply dropping leaves over the area you wish to fertilize. Comfrey leaves break down quickly, thus releasing their stored nutrient in an expedient manner. As they break down so quickly, compost leaves are also excellent compost boosters. If you have a lot of carbon in your compost pile and it isn't heating and braking down, a quantity of comfrey leaves incorporated into the pile will soon set things in motion.
Comfrey can be fed to animals. Comfrey CANNOT be exclusively fed to lifestock. As an animal feed comfrey is a protein powerhouse! Testing out between 22 - 30% protein. It is also micronutrient rich containing calcium, iron, potassium and phosphorus. Opinion varies on the amount  of comfrey to feed. I have heard or read that it can comprise as much as 90% of the diet for poultry. (I wouldn't) I have also read that it shouldn't be fed to ruminants. ( I do). The general rule of thumb we use here is 30%. Pigs love it. Goats do too.Chickens I have found to be hit or miss on it. I have seen some of our meatbirds try to peck the eyes out of their neighbour for it, I have seen others peck at it a few times then walk away. Our egg layers like it and it does make a difference in egg yolk colour, and I suspect in the nutrient quality of the egg. So my advice with regard to lifestock feed is, as with all things, is in moderation. 
For medicinal use. Comfrey is an amazing medicinal plant. Its ability to heal skin wounds is unsurpassed. It is so good in fact that you should not use it on puncture wounds or infected cuts as it will seal in the infection, or prevent the wound from healing properly. This is because comfrey has high levels of allantoin. Comfrey is also able to have a marked effect healing injury beneath the skin, as it's traditional name of "knitbone" alleges. I have used comfrey poultices to treat sprains in people, and breaks in animals.  
Comfrey is : useful for bleeding wounds, diarrhoea and  stomach ulcers, lung troubles including bronchitis and whooping-cough. It smooths and softens skin. It is demulcent (treats inflamed,  irritated tissue by coating it – e.g. treating a dry cough). Antiseptic: helps treat or prevent infection in wounds. Styptic: helps stop bleeding. it is also a powerful antioxidant.
I use comfrey in poultices, tincture, creams, bath bombs, infusions and teas. 
The controversy.
  In the past 12- 15 years comfrey has become controversial. The powers that be have been warning about the use of comfrey because of the presence  of PA . PA stands for pyrollizidine alkaloid, are naturally occuring alkaloids which many plants produce as a pesticide. It is estimated over 30% of all plants produce PA. There were several studies completed in the late 1990's and early 2000's which linked ingestion of PA to kidney damage. I have read many of the papers produced as a result of these studies, and found them to be somewhat flawed. The most oft quoted study involved extracting pure PA from comfrey and injecting large doses of it directly under the skin of rats. Obviously this is different than using comfrey as a medicinal. It has been a few years since I read this paper but I remember calculating at the time that a person would have to injest  65,000 leaves of comfrey in one sitting to equal the amount of PA cited in the study. It doesn't taste that good! I could go on for hours on this but all I will say is do your research. Make your own decisions. Unfortunately, because of the hoopla, Health Canada banned the sale of any products containing comfrey in Canada effective December 2003. You can still grow comfrey, you can sell the plant or the parts of the plant but you cannot sell products produced from the plant. Something to note, the Health Canada Ban applies specificall to russian comfrey, Symphytum uplandicum, a sterile variety, and  prickly comfrey, Symphytum asperum, not common comfrey. However if you wish to sell products containing common comfrey you must produce lab results which prove the levels of PA in your product. Obvioulsly for small producers like myself and other herbalists this is coast prohibitive. So for now I can only use comfrey for my family and my animals.
Picture
0 Comments

Pasture Pranks.... a little fluff for a grey day

20/5/2014

0 Comments

 
When we first arrived last year there was a solid wall of green starting about 30 feet from the back of the house. It was mostly scrub; alders, willow a few decent old apples, and a lot of coppiced maple and ash that had been cut a couple of years ago. 
Picture
Picture
So we fenced out the trees we wanted to keep.
Next we cleared some of the brush, then the goats cleared a lot of brush,  and for
the winter there was a large pile of brush down at the lower part
of the
pasture.

This brush pile was a great source of enjoyment for EVERYBODY! The goats ate parts of the brush pile when they were bored. They played king of the mountain when they finished eating. Once, Ivan even won king of the mountain!
Picture
Alas, all good things must come to an end. Now that spring is finally here the brush pile had to go. In order to start making the pastures real pastures, you know with grass and stuff, the pile had to go. Last night Gary and Reiley burnt the brush pile.
It was a great fire, enjoyed by all. Even Ivan figured out that if he stood in the smoke the blackfies wouldn't come near.
So what is a goat to do? There are a few medium size rocks in the pasture but nothing like the brushpile. Unless....
Unless you are a little goat. Then scale is much different. Medium size rocks become big rocks.. but nothing is bigger than...IVAN!!
Picture
Yep. The babies spent the entire afternoon climbing all over poor Ivan! He took in stride though, mostly just layed there chewing his cud.
You don`t get that in a cubicle. I love homestead living.
Talk to you tomorrow!
0 Comments

4-H Fluff & Buff

19/5/2014

1 Comment

 
The long weekend in May.  Traditionally seen by most Canadians as the start of summer. Everybody has their own traditions, some people open up the cottage, some book their favorite campsite at their favorite National Park, while gardeners traditionally take the opportunity to plant this years garden. However for several dozen families in  Nova Scotia we do something called Fluff and Buff.


Picture
Fluff &  Buff is an amazing showmanship clinic for 4-H members hosted by the Annapolis county 4-H program. It has traditionally been open to members in the beef, dairy, sheep and goat projects. This year they decided to add rabbits to the
mix. The kids arrive Friday afternoon and the program runs until approximately
noon Sunday. The kids recieve great instruction in preparing their animals for
show, clipping and grooming etc. They also have a lot of instruction in showing
your animal and the chance to handle other animals.
Showmanship is all about  presenting your animal to the judge. It is about knowing your animal; knowing their strengths and weakness and how you present the animal. The grand finale is  a show on Sunday morning, where everyone can put their new skills to the test, and also get great feedback from the judges.
Picture
One of the goats turning the tables and checking out the judge

In addition to this there is usually a guest speaker on Friday evenings, this year two of the local large  animal vets gave a talk on recognizing signs of ill health in animals and then held a Q&A session.
Add to all this soccer games, tug of war, water fights and a pizza party! I should also mention the food.. From what I am told  the food is ample and fantastic. This is high praise indeed because unless you  have faced 80+ hungry farm kids at breakfast time.. you don't know cranky.

Fluff and Buff been a tradition in our family for 4 years now.
Every year just seems to get better. Reiley continues to aquire more knowledge
and friends every year. I am continually impressed by the dedication of the
volunteers, this is run by volunteers, most of them 4-H parents or past members.
I have been involved in many sports, teams and childrens programs over the past 25 years; but I can honestly say that 4-H is one of the best.
Picture


Reiley and Pepper showing on Sunday

In Nova Scotia the cost to register per year is less than I have paid for a single hour of coaching,  programming in other organizations. The philosophy behind the program, learn to do by doing, is incredibly refreshing in today's bubble wrapped child mindset. You are not going to learn to weld a bead or grow a garden by watching a  lecture. You need to get in there, hands on, make mistakes, practice and move  forward. 4 -H does this. It is a refreshing attitude. We do our kids a disservice by not allowing them to fail. They need to fail, to test themselves  physically, mentally and emotionally. Without the fail, the victories are hollow.

Picture
1 Comment

Patience and Planning

15/5/2014

0 Comments

 
I was at a meeting Monday evening and I met a woman who, along with her son, daughter-in-law and two small grandchildren, recently moved to the area.  They have purchased a property and her son wants to homestead.
Like about half of the people we meet through our homestead and consulting business he has no background in farming. This lady commented that he was working probably harder than he ever had in his life trying to get everything done.
It is something we see a lot of. I wanted to address that age old question of "where do I start?"
Unless you have recently won the lottery, or you are going to gamble your entire life savings on your property, you most likely will not be purchasing the picture perfect homestead featured on the cover of the last country magazine you bought.
Lets face it, homesteads or hobby farms, are about living a lifestyle. People tend to want  a connection to the land, to know where their food comes from, and generally a slower pace of life. Although some may argue with me on the slower pace of life after 12 hours of chores and garden weeding when, just at dusk, the neighbour calls to politely inform me that my pigs are digging up her tulip bulbs and could I please come and catch them.
The biggest mistake we see people who are new to this life style making is the idea  that everything has to be done NOW.  That within a year of purchasing your property everything has to be in place. The gardens have to be immaculate, all the livestock penning and shelter has to be built and looking like something off the cover of chicken home and garden
These are the people who will burn out after year, they're just setting the goals way too high and in the process setting themselves up to fail.
The  truth is most of the good homestead are ones that are built slowly. You need to take the time to get to know your land, to see how the sun moves across your land throughout the entire year. Where the prevailing winds originate in summer and winter. Does that bottom land flood every spring or just in very heavy snow years?
You also  have to consider how you are going to use your property, are you going to build a 2 acre market garden, or only produce food for yourself? Do you plan to use tractors, draft animals or hand tillers?
When you buy an existing farm or homestead you're probably going to
inherit the concept that the person who had the land before you had. Sometimes
it's a great and sometimes tit's all wrong. Hopefully hopefully whoever built
the farm knew what they were doing. However more and more we are seeing people buying raw land, or a small acreage with just a house and possibly a garage or shed. There are drawbacks and advantages to both but you need to realize that it will take time to build. 
You need to have a plan. Not a drawn in stone plan, but before you start throwing time and money at building infrastructure you need a priorities list. You should also have a land use plan in mind, especially if you are planning on making income from your homestead.
Now I realize that if you are bringing animals with you, you need immediate shelter, (been there done that). But that does not mean that you lay out $5000 for lumber and build a barn the first month. You need to see where you are going.

First: What do you want to do? Write it down. Be specific. Be realistic. We have 2 sayings here; they are based on over 25 years of experience.
# 1 is  first you get good, then you get big. (# 2 is garbage in - garbage out but we will deal with that another day.)
Start small, figure out the bugs in your systems. For example: you want to raise chickens for your own food, instead of ordering 65 chickens for your first run, order 10 or 15 hopefully on the first order date of the season. You will know within a couple of weeks if there are glaring problems with your set up. You may build a fabulous chicken co-op, but then come home the first day the chickens have been outside to discover a hawk has taken some of your birds. Better to find out you have a weasel or feral mink with 10 birds vs. 60.
The same applies to gardens, test your soil. Even if it is only a basic ph and soil structure test. It is a lot easier to augment your soil before a crop is in the ground than after.
Second: plan it out. Get out the graph paper or software. Note the location of buildings, large trees, the driveway. Mark the compass points. Does the plan work. Make use of the zoning principles in permaculture. Zone one areas are places you utilize everyday, usually more than once a day. Take seasonal differences into consideration. The first big snowfall is not the time to discover that the most logical place to pile snow is now covered by your young fruit orchard. Think about leaf fall, access to buildings and water movement. If you are going to be hauling several hundred kilos of feed a month you probably want fairly convenient access to your feed storage, same with hay. That leisurely stroll up the path to the barn in summer becomes a treacherous ice field trek in January. Talk to your neighbours. They can tell you that the wonderful spot you have for your garden was where the former owner parked the school bus for 20 years.
I'm going to wrap this up  for today as I have already blathered on way longer than I had intended. That's what happens when you are passionate about something; and I am very passionate about helping people establish their homesteads. I want every person who dreams of having this lifestyle to be enabled to succeed. I firmly believe that small farms, homesteads, self sufficient suburbanites, what ever you want to call them are imperative to feeding the country. I also know that planning and patience are the best way to make sure that each one is a success. Hopefully I have given you lots to think about, for those of you just starting out don't be discouraged that you are not where you thought you would be.  First you get good. Then you get big.


0 Comments

A Garden is What You Make It

14/5/2014

1 Comment

 
We have spent the past couple of days getting-the ground ready for this year's veggie garden. The master plan says that this plot of land will eventually be home to two elderberry and my annual herb patch, but since the site of the permanent veggie garden is currently being cleared and fertilized by the goats, a small veggie garden is better than no veggie garden.
it is a far cry from our last veggie garden, it isn't even big enough to provide us with all the produce we will eat this summer. The last garden was close to two acres and it's prime designation was a market garden, it required close to 90 man hours a week to plant, weed and harvest. 
I am estimating this one will be less than an hour a day. Sometimes it m seems like a huge step back in order to move forward.
Gary and Matt working in our market garden in full summer glory:
Picture
The size of this years plot is approximately 15' by 70'. I do have to say that we were very surprised when we tilled it up. There was almost no garbage, and it has some of the best soil we have encountered on the farm. A nice loam, a little too sandy, but the beasties have been busy producing organic matter all winter.
Here is the new garden in all its brown glory
Picture
Glorious isn't it! To be absolutely honest I am just so thankful to have a garden that I know is mine, and no one can change their mind about and take away from me. I would probably be happy growing tomatoes and lettuce in a planter at this point. The biggest issue is going to be working away at the knotweed down at the end of  the garden. I would prefer to not have to bring a mini backhoe in to remove the mess.
Over the next few days I will be putting the transplants in. Some tomatoes: Golden Boy, plum, cherry and scotias. I have onion sets, and some garlic ready to go. I will be direct seeding table cukes, pickling cukes, a few zucchinni (for relish), lettuce, spinach, pole beans, broad beans, peas and kholrabi.
So that will be this years veggie garden, some will say it is a step down from what we had, I prefer to think of it as a small step sideways as we steady ourselves from the big leap forward.
1 Comment

Missing Posts

13/5/2014

0 Comments

 
Hi everyone,
We are having computer issues. I should have new posts uploaded by tomorrow, Wednesday, afternoon.
0 Comments
<<Previous
    Picture
    A  4-H Family
    Lives Here

    Receive inspiration and information for your homestead several times a week

    * indicates required

    Author

    Hi! I'm Shelli Killen,
    a homesteading, homeschooling, wife and mother of five. 

    I am a student  herbalist with a passion for learning and a  habit of bringing home strays.

    I love music, and the power of creating things with my hands.
     
    I tend to do best when life around me is organized chaos
    .

    RSS Feed

    Categories

    All
    Bees
    Canning
    Chickens
    Economy
    Gardening Vegetables
    Goats
    Herbs
    Hobby Farming
    Homesteading
    Homesteading Skills
    House Management
    Lifestyle Planning
    Pigs
    Self Reilance
    Self Sufficiency

    Archives

    December 2014
    November 2014
    October 2014
    September 2014
    August 2014
    July 2014
    June 2014
    May 2014

Powered by Create your own unique website with customizable templates.