
In an effort to start giving this blog a little structure, today I am starting a weekly feature .... presenting ...
The first How To Tuesday!
Every Tuesday I am going to feature a necessary homesteading skill and break it down for you, step by step, complete with pictures. Since this is preserving season we are going to start with making my amazing zucchini relish.
I know, man cannot live on relish alone, even though it is a great relish. I have chosen this recipe for a few reasons, firstly it is a small batch recipe. You don't need a lot of ingredients or even lots of fancy canning equipment. Second, the acidity in this recipe is such that there is very little chance of having an issue with bacteria contamination. Provided you follow the recipe and you get a good seal with your lids.
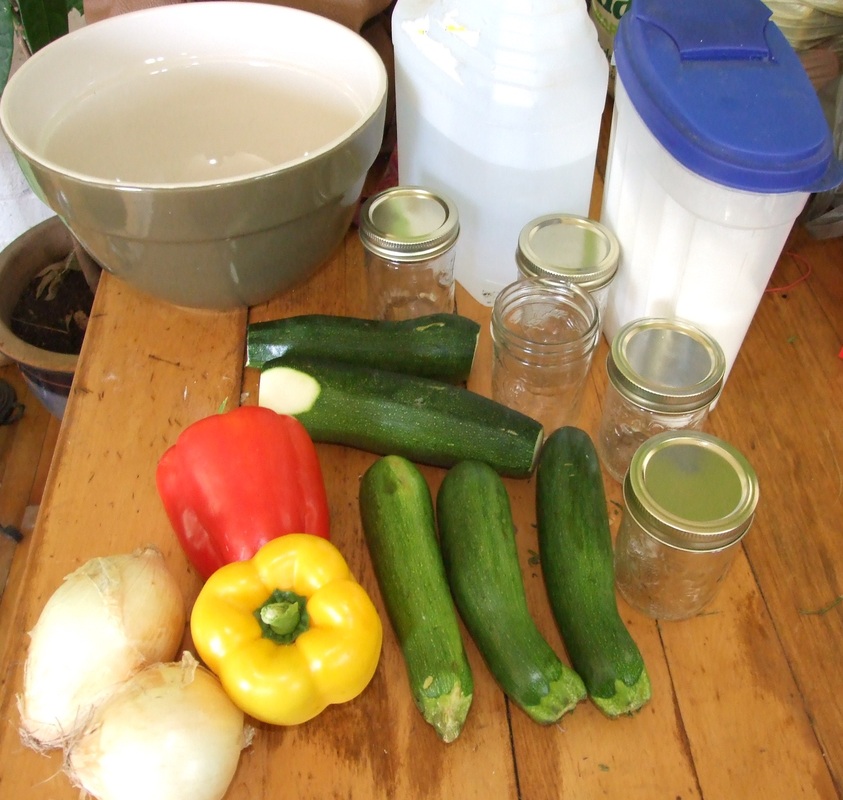
So let's get started. For this recipe you will need:
5 cups of finely chopped zucchini, approximately 5 small zucchini, I like to make this relish colourful so I use green and yellow
1 1/2 cups of finely chopped onions, approximately 2 medium or 3 small, you can use white or red onions
1 1/2 cups finely chopped sweet peppers, approximately 2 medium sized, can be any colour
1/4 cup of pickling or coarse salt
cold water
1 3/4 cup of sugar
1 1/2 cups white vinegar
1/4 cup water
1 teaspoon each celery seed and ground tumeric
1/2 teaspoon of mustard seed
You will need approximately 6 - 250 ml (half pint) canning jars with fresh, never used, lids and rings. A sharp knife or food processor to chop your vegetables to a fine chop. A measuring cup and a cutting board.. A non-metal bowl large enough to hold all the chopped ingredients, a colander, a pot to cook the relish in and a pot to process the newly filled jars in. A ladle and a canning funnel make the job a bit easier.
Note: it is helpful to have a way to keep the full jars directly off the pot bottom during processing, this tends to lesson the chances of jars splitting during processing. You can buy one of those fancy jar holder / lifter racks. (Heck you can buy mine because I never use it) What I generally use is a round wire rack that Gary modified to fit my canning pot. I use this because the fancy lifter rack only allows me to process five jars at a time, while I can do eight with the rack. I will show you a different option today if you don't have either of the above.
The first How To Tuesday!
Every Tuesday I am going to feature a necessary homesteading skill and break it down for you, step by step, complete with pictures. Since this is preserving season we are going to start with making my amazing zucchini relish.
I know, man cannot live on relish alone, even though it is a great relish. I have chosen this recipe for a few reasons, firstly it is a small batch recipe. You don't need a lot of ingredients or even lots of fancy canning equipment. Second, the acidity in this recipe is such that there is very little chance of having an issue with bacteria contamination. Provided you follow the recipe and you get a good seal with your lids.
So let's get started. For this recipe you will need:
5 cups of finely chopped zucchini, approximately 5 small zucchini, I like to make this relish colourful so I use green and yellow
1 1/2 cups of finely chopped onions, approximately 2 medium or 3 small, you can use white or red onions
1 1/2 cups finely chopped sweet peppers, approximately 2 medium sized, can be any colour
1/4 cup of pickling or coarse salt
cold water
1 3/4 cup of sugar
1 1/2 cups white vinegar
1/4 cup water
1 teaspoon each celery seed and ground tumeric
1/2 teaspoon of mustard seed
You will need approximately 6 - 250 ml (half pint) canning jars with fresh, never used, lids and rings. A sharp knife or food processor to chop your vegetables to a fine chop. A measuring cup and a cutting board.. A non-metal bowl large enough to hold all the chopped ingredients, a colander, a pot to cook the relish in and a pot to process the newly filled jars in. A ladle and a canning funnel make the job a bit easier.
Note: it is helpful to have a way to keep the full jars directly off the pot bottom during processing, this tends to lesson the chances of jars splitting during processing. You can buy one of those fancy jar holder / lifter racks. (Heck you can buy mine because I never use it) What I generally use is a round wire rack that Gary modified to fit my canning pot. I use this because the fancy lifter rack only allows me to process five jars at a time, while I can do eight with the rack. I will show you a different option today if you don't have either of the above.
Ready to start!
As always, rinse off your vegetables and cut off any noticable skin blemishes. Cut the ends off of the zucchini. If you are buying zucchinni you can tell if they are fresh by looking at the stem end. A fresh zucchini will have a straight moist end where it was cut from the stem. After a few days this will start to look puckered and leathery. Only cut the ends off of a couple of zucchini at a time, you are looking for 5 cups of chopped so measure as you go. When you are processing vegetables, especially to a fine chop, it is better to chill them first. The structure tends to hold up better, especially for water heavy things like peppers and onions. Remember we are going for a fine dice, not mush.
Place the chooped vegetables in your non metal bowl.
Place the chooped vegetables in your non metal bowl.
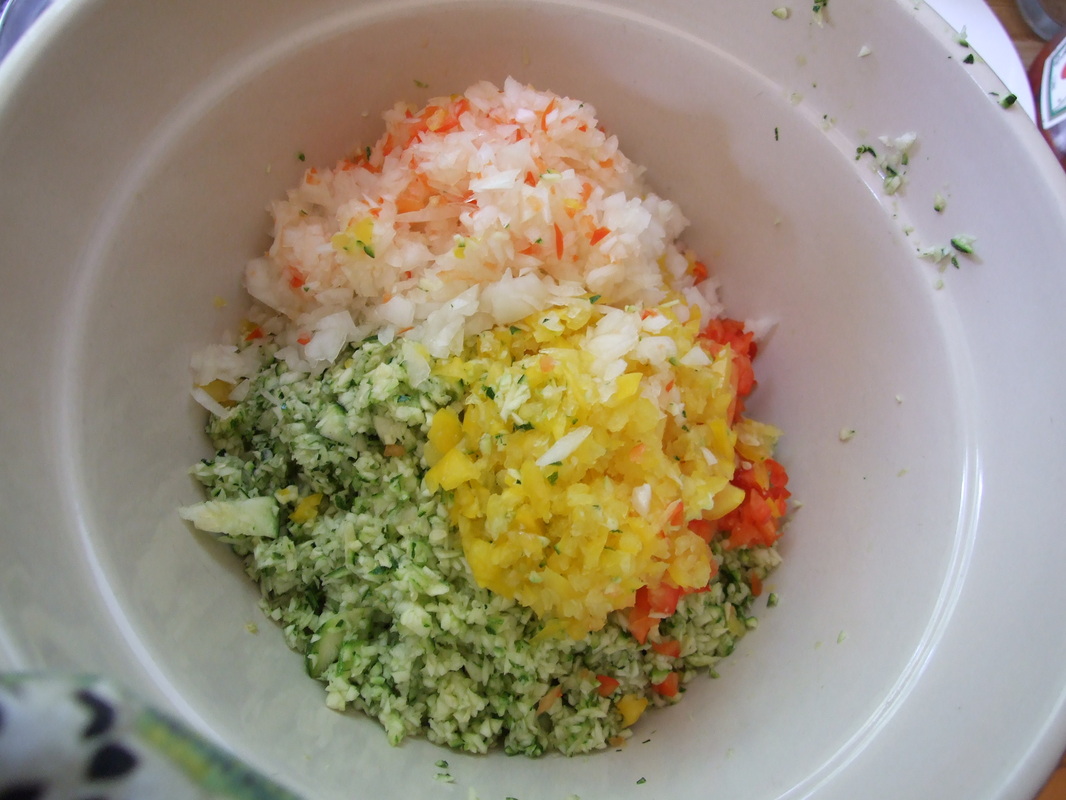
Now sprinkle your 1/4 cup of pickling or coarse salt over you veg.
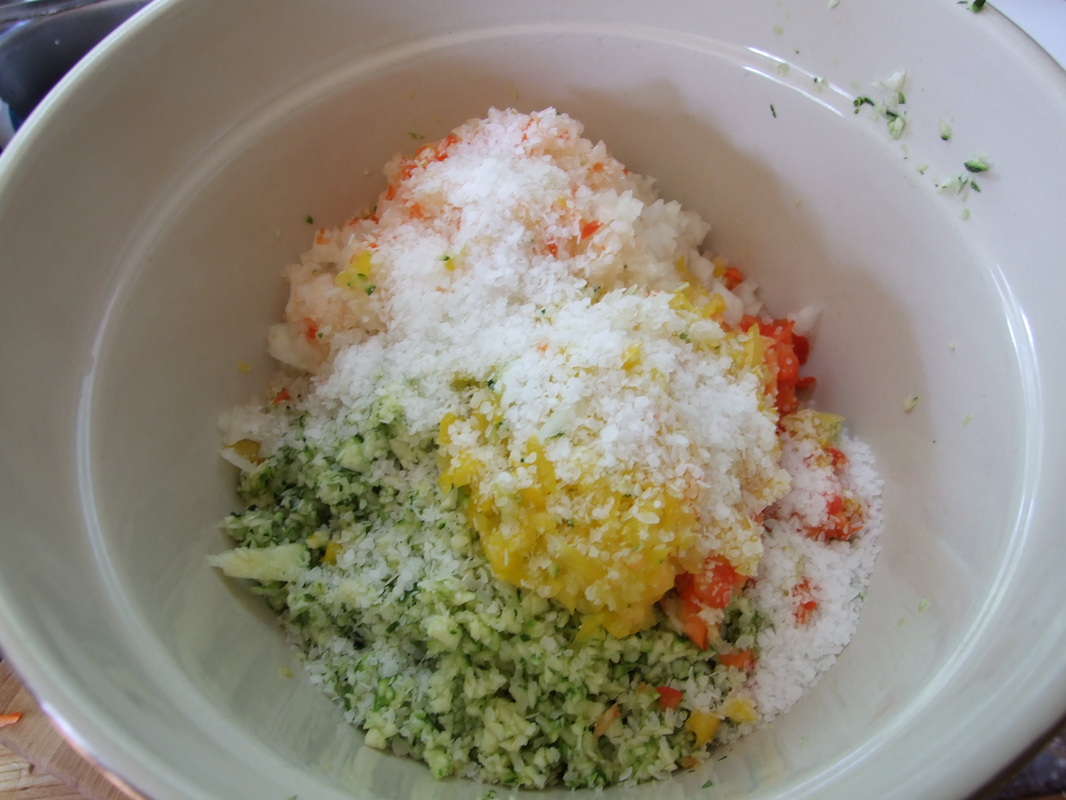
Now mix thoroughly. When everything is well blended add just enough cold water to cover everything.
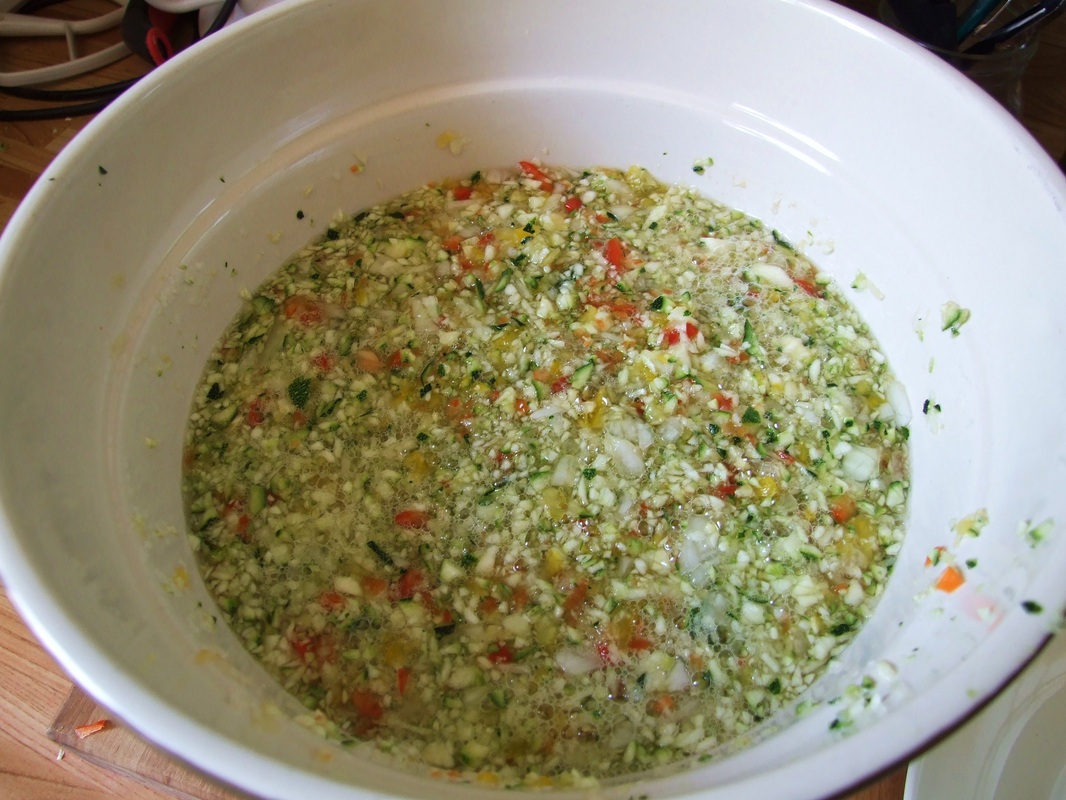
Now you need to cover your bowl, I just put a plate on top, and let it sit for three hours at room temperature.
While you are waiting, it is a good time to measure out your sugar, vinegar and spices. Place them directly in the pot you will be using to cook the relish. Set up your colander in the sink. Now you can relax with a good cup of tea, or carry on with the 500 other things you have to do.
Earlier I mentioned that it is better to prevent your full jars from sitting directly on the pot bottom when they are in the processing stage. I use a stainless steel cake rack in my large canning pot
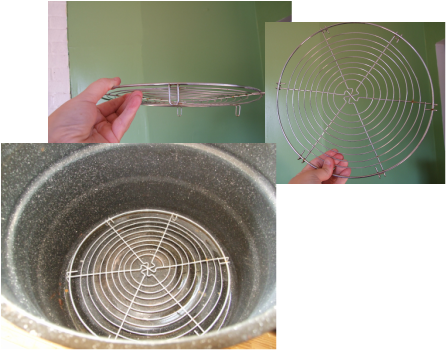
You can see it's a perfect fit. However today I don't need the big pot so I will just be using one of my large stock pots/ To keep the jars from sitting on the bottom of the pot I will use some extra Wide mouth jar rings that I have

Just place them in the bottom of the pot, flat side up and fill the pot with water.
O.K. When there is about 1/2 an hour left for your mix to sit, wash out the jars you will be using, and bring to boil the water you will be using to steralize your
jars and process the relish in.
When your 3 hour time is up, pour the mix into your colander. Let it drain, and rinse thoroughly with cold water. You will lose some small particles through the colander; don't worry it's fine.
Now is when things all start to happen at once. First, turn on the heat for your sugar vinegar mixture. Not too high as you don't want to scorch the sugar. Stir well and frequently to avoid this. You want to bring this mix to a boil, then reduce the heat and simmer for 3 minutes. The steam from this will effectively clear your sinuses from now to Christmas.... don't say I didn't warn you.
While you are doing this, add your jars to the boiling water. This is to sterilize the jars. They don't need to stay in long but they can. You want to time this so that the empty jars are out of the water, but still warm when you are ready to add the relish to the jars. So you can put them in now and take them out when you bring the relish to a boil.
After the vinegar mixture has simmered for three minutes, add the well drained vegetable mixture to the pot. You now need to stir this well, bring the mix back up to a boil stirring occasionally. Once it has reached a boil, turn down the heat and let simmer for 10 minutes. This is a good time to remove the jars from the steralizing pot.
There are various schools of thought on the lids. Some say put them in with the jars, some say just use hot, not boiling water. I fall in the middle. I take each lid individually and dunk it in the hot water after I remove the jars. I hold them in a pair of regular tongs.
Ok. We should have relish simmering, jars sitting close to the stove steaming and lids inside up ready to go on the jars.
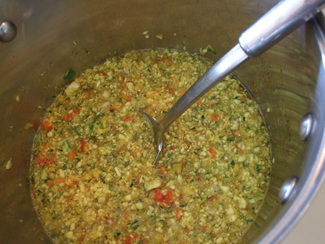
Simmering relish, it should be smelling much better now.
Once the relish has simmered for the required 10 minutes, remove it from the heat, you are ready to start filling jars. I use a canning funnel. It is a wide mouth jar funnel that makes filling the jars so much easier.
Fill the jars to 1/4 of an inch from the top. You will have to play with the levels a little here. You are looking for a good mix of liquid and solid. I use a combination of a large ladle and a slotted spoon to make sure there is enough liquid in each jar.
Once all the jars are full, take a clean damp cloth and wipe the rims. You want to remove anything from the edge that will prevent the lid from making a good seal. Place the lids seal side down on top of the jars, screw the rings onto the jars. Do not put on really tight. If you screw the rings too tight, air cannot escape from the jar during processing, you will then not get a vacum effect thereby no air tight seal.
After you have tightened the lids place the full jars of relish into the pot of water for processing. The jars have to boil for 10 minutes. Do not start timing until after the water returns to a good rolling boil.
This is crucial to getting a good seal and therefore a safe product.
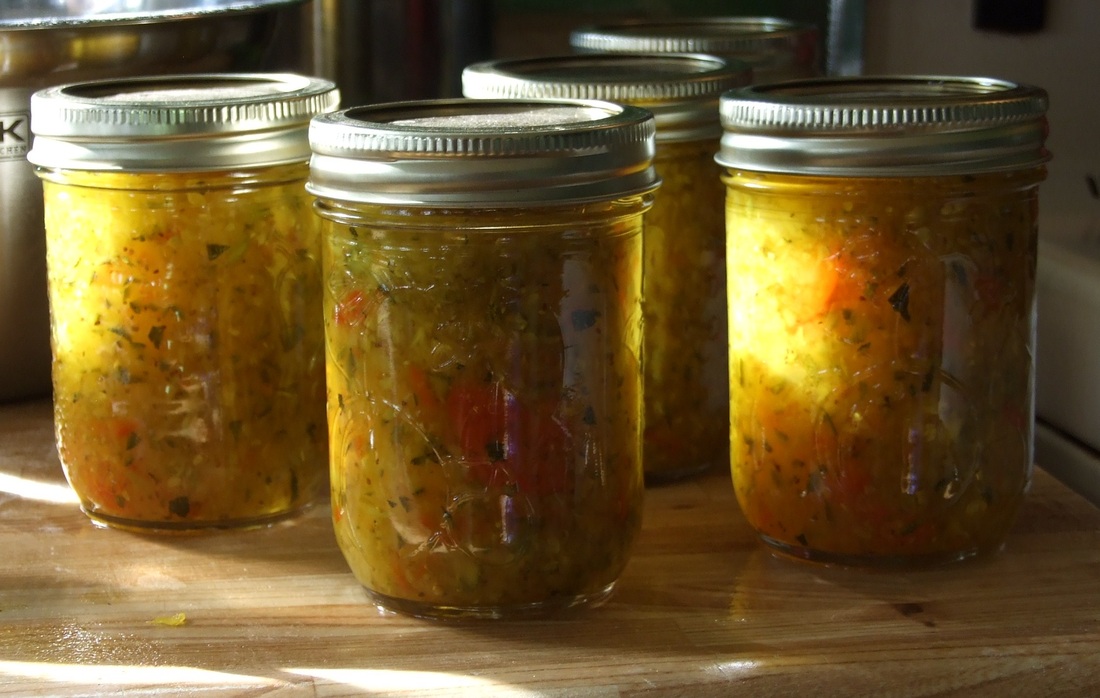
After 10 minutes, turn off the heat and remove the jars from the water. Place them where they can sit until cool. You should start hearing that distinctive 'POP' sound. Try and keep count, there should be 1 pop per jar. You can also check for a good seal by making the sure lid has a slight depression. This indicates a good seal.
TADA! Your relish is is now done.
Once the jars have cooled down, store them in a cool dry place. They will keep for at least two years. That said, always inspect the jars before you open them, the lid should be difficult to remove the first time. Once you have used the lids they should not be used again for anything that requires a seal. You can use them to store other things in your jars. So you can keep them or not. The rings are good for many uses. As are the jars, unless you have a chip on the top rim of the jar. If this occurs, you will not be able to get a seal and you should repurpose or toss the jars.
Fill the jars to 1/4 of an inch from the top. You will have to play with the levels a little here. You are looking for a good mix of liquid and solid. I use a combination of a large ladle and a slotted spoon to make sure there is enough liquid in each jar.
Once all the jars are full, take a clean damp cloth and wipe the rims. You want to remove anything from the edge that will prevent the lid from making a good seal. Place the lids seal side down on top of the jars, screw the rings onto the jars. Do not put on really tight. If you screw the rings too tight, air cannot escape from the jar during processing, you will then not get a vacum effect thereby no air tight seal.
After you have tightened the lids place the full jars of relish into the pot of water for processing. The jars have to boil for 10 minutes. Do not start timing until after the water returns to a good rolling boil.
This is crucial to getting a good seal and therefore a safe product.
After 10 minutes, turn off the heat and remove the jars from the water. Place them where they can sit until cool. You should start hearing that distinctive 'POP' sound. Try and keep count, there should be 1 pop per jar. You can also check for a good seal by making the sure lid has a slight depression. This indicates a good seal.
TADA! Your relish is is now done.
Once the jars have cooled down, store them in a cool dry place. They will keep for at least two years. That said, always inspect the jars before you open them, the lid should be difficult to remove the first time. Once you have used the lids they should not be used again for anything that requires a seal. You can use them to store other things in your jars. So you can keep them or not. The rings are good for many uses. As are the jars, unless you have a chip on the top rim of the jar. If this occurs, you will not be able to get a seal and you should repurpose or toss the jars.
I hope you have found this helpful, if there are specific homesteading skills you would like to see on How To Tuesday just let me know in the comments. In the next few weeks I thought about skills like trimming goats hooves, preserving different parts of the harvest planting the fall garlic, putting together a herbal based first aid kit, one for people and one for your four legged people. It will soon be 'pig day' here which is what we call the day we have all hands on deck for butchering our early fall pig. There will be chickens to process in a few weeks time so I could cover that also.
I am really looking for direction from you, if there are skills you want to learn, let me know and we will do our best to feature them for you!
Have a great day everyone.
I am really looking for direction from you, if there are skills you want to learn, let me know and we will do our best to feature them for you!
Have a great day everyone.

 RSS Feed
